Vegan Boeuf Bourguignon Stew – Just like Julia’s

One of my favorite cookbooks of all time is Julia Child’s “The Art of French Cooking”. It is sticky and covered in sauces and oil and butter and flour. I used to use that and my favorite mexican cookbook so religiously that they looked like they had been dipped in the foods rather than utilized to make them. There is one recipe I knew by heart and is obviously a huge fan favorite for the carnivore and omnivores out there: Boeuf Bouguignon. It is a Braised beef dish similar to a beef stew in essence. I decided to attack this dish head on because my vegan world isn’t the same without it. I know the flavors and the essence I want to create so making it vegan is actually easier than one may think but remember, if you want it just like Julia’s you do need to put in the time to make it and of course the butter (the earth balance butter that is).

I would like to make note that I initially made this without tasting it. My mother an omnivore had to taste test because I had ruptured my esophagus a few nights before. She loved it and I caught her going back for “extra tastes” later on. I can say that the beef in the oven covered in flour and crisco and pureed onions made my house smell like heaven though. It was hard not to just throw doctors orders out the window and face the throat pain just for a little taste. But I didn’t. I tasted it last night though and it is divine. Please try out the recipe and I promise this will become a warm comforting favorite you can’t believe you lived without.

IMG_2031

______________________________________________________________________________________________________________________________

Vegan Boeuf Bourguignon

(2) tablespoons Crisco

1 tablespoon Liquid Smoke

(1) Onion

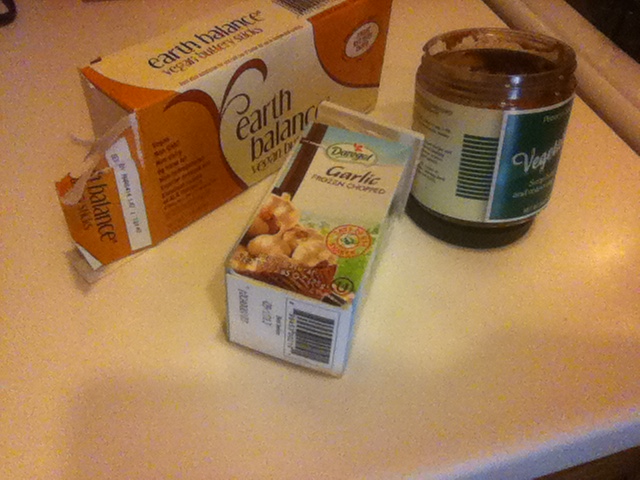
(2) sticks Earth Balance Buttery Sticks

Kosher salt

Fresh Ground Pepper

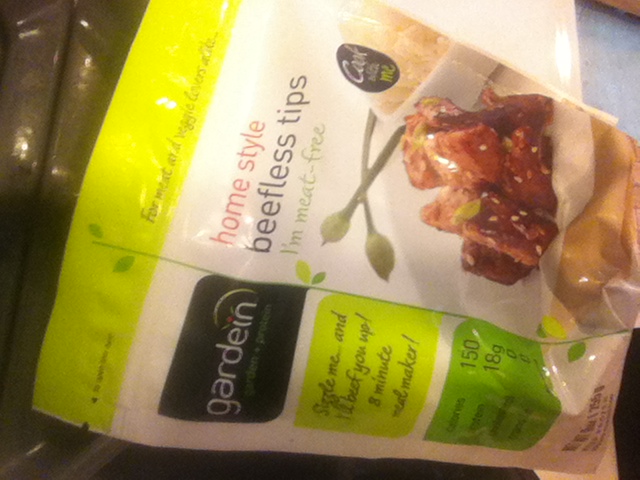
(2) packages Gardein Beef

1/4 cup Flour

(1) Package Baby Carrots (diced)

(1) package of white button mushrooms

(3)  Medium Yukon Potatoes

1 tablespoon thyme

1 tablespoon frozen minced garlic

(3) Cups Cabernet Sauvignon Red Wine

(3) Cups Water

(2) tablespoons Vegetable Bouillion

(1) Small 6oz can of Tomato Paste

2-3 bay leaves

2-3 tablespoons parsley (fresh preferred)

1/2 cup flour (to make paste)

Preparation:

  • Rough Chop onions.
  • Dice Carrots and mushrooms.
  • Chop Potatoes into cubes.
  • Place extra large sauce pan or dutch oven on medium low heat with crisco, liquid smoke, and at least 1-2tablespoons salt.
  • IMG_2001   IMG_2002
  • Preheat oven to 350degrees.
  • Get out a small food processor or immersion blender and several spoons. You will want to check the salt/seasoning level throughout.

Begin Cooking:

  • Once the crisco melts at onions and stir onion, oil, salt, smoke misture until onions are golden.
  • IMG_2004
  • Take onions out leaving a small amount of oil in the pan.
  • Puree onions in the food processor then return mixture into the pan.
  • IMG_2006   IMG_2008   IMG_2009
  • Add (2) packages of Gardein Beef Tips. Cook until slightly soft and seared about 3-5 minutes.
  • IMG_2010   IMG_2011   IMG_2013
  • Sprinkle on 1/4cup of flour and stir until meat is covered in the onion flour mixture.
  • Place beef cubes on a cookie sheet and place in warm oven approximately 30 minutes.
  • IMG_2016
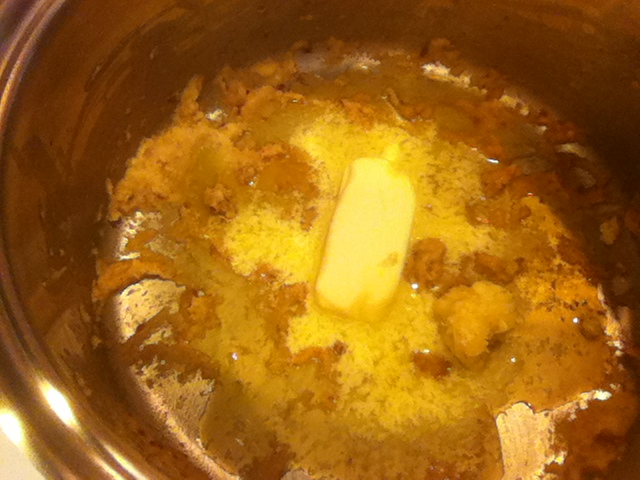
  • Take 1 stick of butter place in pan and scrape the bottom bits up. Add Garlic.
  • IMG_2015   IMG_2014
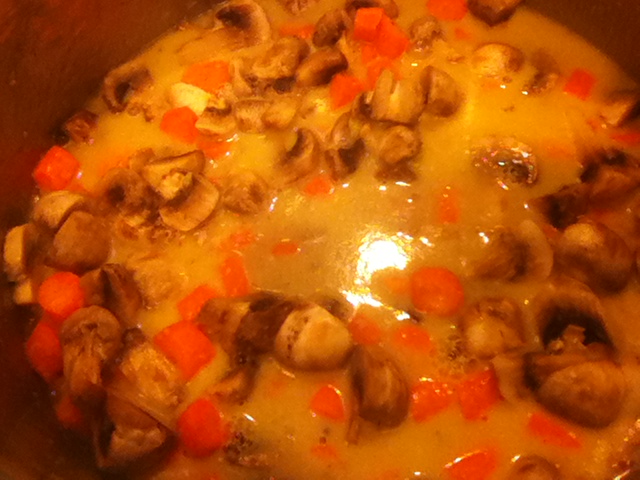
  • Add carrots and cover in melted butter. Add mushrooms next. Add salt and pepper while tossing.
  • IMG_2018   IMG_2019   IMG_2021
  • Add vegetable bouillion, water, thyme. Mix well until everything is combined. Start to simmer.
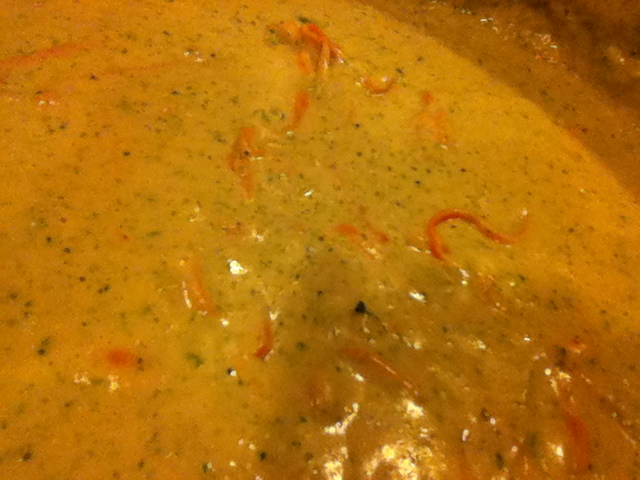
  • After the sauce is simmering add tomato paste and wine.
  • IMG_2022   IMG_2024
  • After the sauce has cooked down about 30 minutes and the meat is crusty and firm on the outside, add the potatoes and meat back into the stew.
  • IMG_2020   IMG_2026
  • Stir in 2-3 bay leaves and parsley.

Finishing it Off:

  • Last, after another 30 minutes. Remove 1-2 cups of the broth, a few carrots, mushrooms, and potatoes and place in a small sauce pan (my immersion blender has a little pot to puree in so I use that). Add 1/2cup of flour and make a paste with an immersion blender.
  • Add last stick of butter to stew pot and then stir in paste with the immersion blender until creamy and combined.
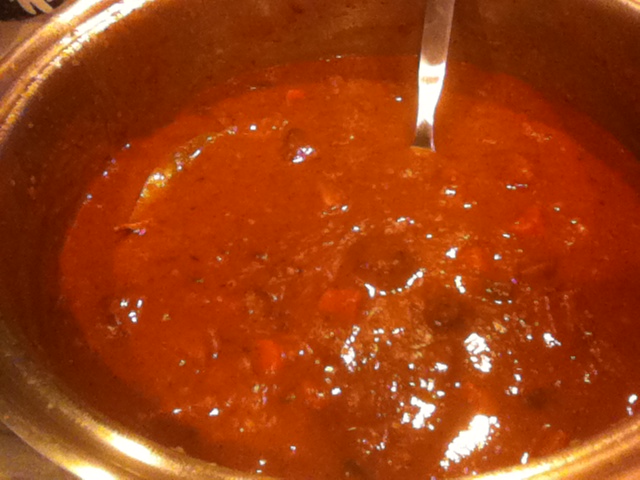
  • Cook for at least 30 more minutes. It will be nice and thick and the wine will have cooked down at this point. Your home will also smell like heaven.
  • IMG_2030
  • Serve hot with some crusty bread on a blustery fall or winter weekend.
  • It also keeps for about a week in the fridge or for months in the freezer! Enjoy!

Total servings 12. Serving Size is approximately 1 cup.

____________________________________________________________________________________________________________________________

XOXOX,

The Hippie Gypsy

Creamy Broccoli Cheese Soup

When I wasn’t vegan and I was applying to law school I worked at a law firm in Quincy, MA near a Panera Bread. My favorite lunch was always a bowl of their signature Broccoli Cheese Soup and a toasted Asiago bagel and an apple.  The soup was so decadent and the sharp Asiago smothering the bagel made me just fall into a million pieces. I would’ve eaten this over a filet mignon or fancy lobster dinner (mostly because I never liked either but also because it was that good in my mind). So when I was beginning my ideas for this next week of blogging on soups, stews, and chowders I thought that I really must start off with Broccoli Cheese Soup. I have eaten the broccoli cheese soup in Chef Chloe’s cookbook and it is very good and very healthy but I wanted to make a truly decadent creamy creation that reminded me of that soup near the law firm. So with that I present my version.

Picture 048

____________________________________________________________________________________________________

Creamy Vegan Broccoli Cheese Soup

Ingredients:

6 tbsp olive oil

1/2 cup flour

1/2 tsp granulated garlic

1 tbsp vegetable bouillon paste (I use Penzey’s)

1 1/3 cup Daiya Mozzarella Shreds

(1) White Onion

(2) Heads of Broccoli

(6) Small or Baby Carrots

1 qt of Soy Creamer

1/2 cup soy milk

1 cup of water

1/4 cup Tofutti Better than Cream Cheese

1/4 cup Tofutti Sour Supreme Sour Cream

Salt

Picture 035

_________________________________________________________________________________________________________________________________

Prepare the Base:

  • Put (2) tablespoons of oil in a pan with salt and (1) onion chopped into rings.
  • Sweat the onion on medium heat until very soft and light golden brown. They will naturally start to separate as they heat up, so continue stirring.
  • Take 1/2 of the onions out and place in an extra large sauce pan. Add broccoli and 1 tbsp oil and place on medium heat,
  • Toss oil, onions, and broccoli and sprinkle with salt. Leave on medium heat.
  • Take remaining onions in the frying pan and add 3 tablespoons oil and flour. Stir until it forms a paste.

Picture 034

Cooking down the soup:

  • Pour creamer into large sauce pot with broccoli and onion mixture.
  • Bring to a simmer.
  • Add all remaining ingredients and oil/onion paste except for carrots.
  • Stir until broccoli is soft and well combined. The sauce should be thick now and form a film on top if not constantly stirred.
  • Take an immersion blender and place in pot allowing the blender to chop and puree the broccoli. You can reserve a few small pieces if you want it a little chunkier.
  • Then shred the carrots with a peeler or making matchsticks with a sharp knife and add a few minutes before serving. These should be cooked but slightly crisp.
  • Serve hot and Enjoy!

Picture 045   Picture 046

_______________________________________________

Serves (7). 1 cup servings. WW Points 11.

__________________________________________________________________________________________________________________________________

XOXOX,

The Hippie Gypsy

Banana Bread Bars

There are very few things that can make me feel as cozy as banana bread. My mom would make it all the time when I was a kid (and would even bring it to my dorm in college sometimes). Saving up all the brown bananas we didn’t eat in time and putting them in the freezer. When she had enough she would make the whole house smell like heaven and it was hard to keep us back long enough for the banana bread to cool so she could cut a slice for my brother and I. My grandmother would cozy up next to me with some tea and her banana bread and on those chilly fall days we would watch infomercials and old movies at my parents house. So when I got a tweet on Twitter the other day from a follower that wanted to use up some Chia seeds I thought what better way than to give out my banana bread bars recipe! The recipe is easy and just requires dumping everything in a bowl and mixing and then placing it in the oven. The weather was cool over the weekend so I made a batch as a breakfast snack for my husband and I this week. They were also snacked on by both my parents yesterday while we continued mounting new things to the walls of my new house.  Note: I bribe family and friends with dinner and snacks for free labor 🙂 


banana bread bars done

_____________________________________________________________________________________________________________________________________________________________

Banana Bread Bars


Ingredients:

(3) Bananas (overripe and brown is best)

1 1/2 cup Quick Oats

1 tsp tapioca granulated

2 tbsp chia seeds

1/4 cup of Raw Agave Syrup/Nectar

1/4 cup raw unsalted pistachios

1/4 cup shredded sweetened coconut

1/4 cup chopped pecans

1/4 cup white chocolate chips (I use Lieber’s White Decorative Chips)

Spectrum Coconut Oil Spray for pan


banana bread bars ingredients


______________________________________________________________________________________________________________________

Preparation:

  • Place white chips, nuts, seeds, coconut, and tapicoa in a medium mixing bowl and stir until combined.
  • Add quick oats. Stir until combined.
  • Add bananas (i ususally microwave frozen bananas for 1 minute and then add them). Mix until thick adn well combined throughout.
  • Add agave and fold in.

banana bread raw mix 1   banana bread raw mix 2   banana bread raw mix with oats   banana bread raw mix with banana   banana bread raw mix with agave


Cook!

  • Preheat oven to 350 degrees.
  • Spray a bread pan with coconut oil.
  • Place bar mixture into bread pan and pat flat with spatula.
  • Bake for 30-40minutes until the sides turn brown and the center is firm tot he touch.
  • Cut into 6 bars and serve after cooled about 15-30minutes.
  • Enjoy!


banana bread raw mix patted flat   banana bread raw mix in pan   banana bread bars done


____________________________________________________

WW Points: 8pts per bar.


__________________________________________________________________________________________________________________

XOXOX,


The Hippie Gypsy


Apple Cheesecake Vegan Creme Brulee

The fall weather has officially started here in Coastal Massachusetts. This weekend I started raking, trimming back trees, turned off the Central Air, and opened up all the windows in my house. The cool air made the sheer window coverings sweep the floors from the wind like a chiffon wedding dress. It was a beautiful weekend. I could smell chocolate chip cookies and ocean air from my deck and I even kicked it off with a trip to the Brimfield Antiques Fair which just screams “Welcome Fall”. Together my mother and I picked up a red rocking horse for my nephew Nolan, a few records for my new record player, a set of silverware that completed a set I had inherited which was just dumb luck!, a buddha painted in reds and blues and gold for my side garden to go just underneath the chimes, and a poster from the 1980’s when a friend of mine ran for office which I will make him sign because it was such a fun find! Who doesn’t love a gigantic yard sale? I would be hard pressed to find anyone who doesn’t have a good time at these events. I then went over to my aunt’s to help her pack up her apartment to move to her dream destination. I am so proud of her. I know she appreciates a good dessert. So this weekend I worked on puddings.

Fall is the time for puddings both warm and cold. There are bread puddings (my mom’s favorite) and the more exciting french puddings like the creme brulee and then there are the puddings I would never eat like black pudding. My favorite has always been a vanilla bean creme brulee with a good crunchy crust and a thick custard filling but not to sweet to offset the brulee. My parents would bring us to brunch on Easter and Mother’s day and I would always run over to make sur ethe hotel had the little ramekins of this dessert. So I tried to replicate it now as a vegan with a few fall fun flavors. This is my first of a series of three I will post this week (all tested and approved by the omnivore husband). They are all easy to prepare (35minutes max) but the cooling process (2hrs min.) causes it to be something you have to make in advance. Since everyone in the office was talking about apple picking on Friday we shall start with apple! Enjoy!

145

____________________________________________________________________________________________________________________________________________

Apple Cinnamon Cheesecake Creme Brulee

Ingredients:

  • 1/2cup raw cashews
  • (2) Macintosh Apples Cored, Peeled, Diced
  • 1/4cup maple syrup
  • 1/3cup sugar
  • 1tablespoon agar agar powder (this is vegan gelatin powder found in the asian section of the grocery store)
  • 1tablespoon arrowroot powder/starch (don’t use cornstarch due to the high heat, arrowroot is better)
  • 1 1/4cups Soy Creamer
  • 2 heaping tablespoons of Tofutti Better than Cream Cheese
  • Pinch of Salt
  • 1teaspoon Cinnamon
  • 1 teaspoon-1tablespoon Apple Pie Spice (depends on your pallet, I use a little more)
  • 1/2teaspoon of Vanilla Extract (I use Penzey’s)

073   080   088   072   076   083   084   086   101   120   121   085

_______________________________________________________________________________________________________________________________

Preparation

Place all ingredients in a high powered blender or food processor and mix until smooth.

074   075

If you do not have a high powered mixer soak cashews for at least 4 hours or overnight so that the batter will not be grainy.

122   127   128

Cook

Preheat oven to 375degrees.

Fill a casserole dish with water to go halfway the height of the ramekins or jars you in tend on placing the brulee mixture in. I have used both mason jars and square ramekins before and both come out well.

094   095

Pour batter into each ramekin allowing a little space so that they do not spill over as the casserole dish will be heavy with all the water in it. You need to be careful not to allow water into the ramekins.

130   129

Cook for at least 30 minutes or until the batter is wiggly but not liquidy and slightly firm on top.

132    131

Chill

Take ramekins out of the water with tongs and place on a towel on a drying rack. Let cool 15 minutes and then transfer into the refrigerator for 2-4hours.

134   133

Brulee

After the creme is completely firm and chilled through and you are ready to serve. …Take sugar, sprinkle a good layer on each creme top, and brulee with a hand torch until the sugar bubbles, browns, and quickly hardens.

136   118      144082

Serve Immediatly.

147   146

Serves 6. WW Points 6.

____________________________________________________________________________________________________________________________________

XOXOX,

The Hippie Gypsy

Holy Guacamole!

I can’t pinpoint the exact moment I decided to eat avocados but I know it wasn’t when I lived in Southern California where they grow and I would’ve had the best opportunity at this particular produce. I am funny sometimes in that way. I always find a way to randomly miss a great opportunity like when I got parasite in Guatemala the day before I was supposed to zipline through a rainforest a life long bucket list item. Instead I was in the parking lot getting sick next to a van. But I digress. Back to the avocado, I was always turned off by the green black pimply shell and the bring mushy green insides of this so-called fruit. I knew it was fairly fatty but everyone seemed to love it as some sort of super food. So I categorized it with all those other superfoods like Wheatgrass and Seaweed and Blue Green Algae all of which (at that point) I was not buying into. They seemed alien and gross and I preferred Cheetos and Frozen Pizza. I remember trying guacamole once because my friend CiCi demanded it was amazing at a local mexican food chain one night. I thought it was soupy bland and boring. Then sometime in the past year I started putting avocado on my sandwiches to bulk them up a little after having warmed up to the smoothness of them against spicy roasted peppers at a peruvian sandwich shop near Downtown Crossing in Boston before I went vegan. I decided it was time to try guacamole but on my own terms. I would have to make it myself. I scoured the internet and saw about a thousand different recipes and gave up on them all. What flavors would I want? What would make it fresh? My mom says cilantro tastes like soap and avocados like dirt so how can I offset those flavors that she thinks she tastes so she won’t gag at the next dinner party? So I spent the day in the grocery store and then in the kitchen mixing the flavors together until I got what I wanted. I didn’t want mushy, I needed some acidity, I needed salt. So here is what I produced. It is both mom and husband approved and everyone that has tried it said the same thing “I usually don’t like guacamole from the store but I love this it’s so fresh tasting!” Mission accomplished.

guac 3

_______________________________________________________________________________________________________________

Guacamole

Ingredients:

1-2 capfuls of lemon juice

2 avocados

1 container of Whole Foods PreMade Salsa Fresca (or you can make it:  http://www.wholefoodsmarket.com/recipe/learn-cook-fresh-salsa)

Kosher Salt

Fresh Ground Pepper

______________________________________________________________________________________________________________________________________

Time to Prepare!

  1. I make sure that both of my avocados are a little soft to the touch they don’t have to be super squishy but a finger imprint and a dark skin almost black are good signs.
  2. I then slice them in half by placing them upright like a pear and going straight down until I hit the seed and then circling around the seed keeping that straight line of cutting it in half.
  3. I pull the two halves apart and I either scoop out the seed with my avocado tool or if it is in the dishwasher I pull it out with my fingers or I stick a knife in it and pull until it loosens up and falls out.
  4. I then scrape out the contents with my avocado tool or make a slice down the center of the fruit flesh without piercing the skin and then across making little blocks and turn it inside out to pop out the blocks of avocado like ice cubes in a tray.
  5. I take all the cubes and mash them lightly with my avocado tool or a fork but I make sure it stays chunky. Over mashing will cause it to get soupy when you add the lemon juice and salsa.
  6. Then add kosher salt and pepper to taste. I use at least 1-2 teaspoons of salt and a few grinds from a small pepper grinder.
  7. Add the capful or two of lemon juice (I use Real Lemon) and then toss with a fork.
  8. Last add 2-3 heaping spoonfuls of the salsa fresca to the mixture and lightly mix. This adds the exact freshness that the guacamole needs to not be bland. I love that Whole Foods prepares it and has it on ice in the prepared foods section. I would hate to have to cut up all those tomatoes and onions. 
  9. Serve with corn chips or on top of my chili recipe.  

   guac 1                    


   guac 2


Weight Watchers Points: 1/4 of bowl is 4 points. 1/8 is 2 points. So eat it up with some fresh chopped veggies or in a veggie soup for a low point dinner or lunch!

____________________________________________________________________________________________________

XOXOX,

The Hippie Gypsy


Lemon Blueberry Breakfast Bundt Cake

I use two cookbooks when making cakes in most cases either Chef Chloe’s cookbook “Chloe’s Kitchen” or the “Joy of Vegan Baking”. The Joy of Vegan Baking has an excellent Lemon Blueberry Loaf Cake Recipe if I remember correctly. For the purposes of this cake we are doctoring up Chef Chloe’s vanilla cake recipe (www.chefchloe.com) and making it a lemon blueberry cake for brunch in honor of my Mother’s birthday this past week.

My family is big on brunch. We do Easter brunch every year and for most informal birthday or family get togethers. We are great at doing brunch and I have been to so many hotel brunches all over the world I feel spoiled by them during my Sunday indulgences. I think that brunch is so much fun for everyone because it encourages good eating through small portions and copious amounts of veggie and fruit options even when they are not always attached to vegan items. There are fruit cups, quiches, and omelettes filled with veggie fillings so I am all about it! However, the pastries and baked goods are always filled with eggs and dairy so I am going to change that today with this travel friendly recipe to bring to your next family soiree. I promise everyone will love it. I have made it for a potluck at work a few years ago and recently for a family get together after the funeral of my grandmother and as the only vegan I always suffer the “this tastes different” criticism. But not with this cake. Even my Dad was found picking at it long after brunch was over!

lemon blueberry cake altered image

____________________________________________________________________________________________________________________________

Lemon Blueberry Bundt Cake

Ingredients:

  • 1 lemon
  • 1 cup of fresh blueberries (plus 1 cup for garnish)
  • 1 jar lemon marmalade (for garnish)
  • 1 tbsp of Lemon Extract
  • 3 cups all-purpose flour (or gluten-free all-purpose flour plus 1 ½ teaspoon xanthan gum)
  • 2 cups sugar
  • 2 teaspoons baking soda
  • 1 teaspoon salt
  • 1 ¾ cups soy milk
  • 1 cup canola oil
  • ¼ cup white or apple cider vinegar (I use ACV not white)
  • 1 tablespoon pure vanilla extract (I use Penzey’s Mexican Vanilla Extract)

blueberries garnish cake

TIME TO BAKE!

Chef Chloe’s Vanilla Cake Recipe with my additions in bold caps:

  1. Preheat the oven to 350 degrees F. Lightly grease three 8 or 9-inch round cake pans and line the bottoms with parchment paper.
  2. In a large bowl, whisk together flour, sugar, baking soda, and salt. In a separate bowl, whisk together nondairy milk (I USE ORGANIC SOYMILK) , oil, vinegar, and vanilla (ALSO ADD THE ZEST OF ONE LEMON RIND AND 1TBSP OF LEMON EXTRACT AND 2 TBSP OF LEMON JUICE.)
  3. Pour the wet mixture into the dry mixture and whisk until just combined. Do not over mix. (THEN SPRINKLE 1 CUP OF FRESH BLUEBERRIES LIGHTLY WITH FLOUR AND FOLD INTO BATTER. THE FLOUR HELPS THEM FROM SINKING STRAIGHT TO THE BOTTOM OF THE CAKE PAN.)
  4. Fill each prepared (BUNDT) cake pan evenly with batter. Bake for (20-30) minutes, or until a toothpick inserted in the center of the cake comes out clean with a few crumbs clinging to it. Rotate the cakes halfway through the baking time. Cool the cakes completely before assembly.
  5. I then flip the cake over on a cake pedestle and sprinkle with powdered sugar and garnish with fresh blueberries in the center. I serve this with lemon marmalade that I buy when it is on sale at Christmas Tree Shops since they are famous for having sales on jars of jellies.

lemon blueberry cake 2

Enjoy!

Serves 12.

lemon blueberry bundt cake


WW POINTS: 9pts per serving. (Based on 12 servings)


blueberry cake chunk

_________________________________________________________________________________________________________

XOXOX,

The Hippie Gypsy

Fillo Primavera: Veggie and Cheese Filled Pastries

I love that there are so many types of pastry and dough on the market that are vegan. Mostly because Crisco and Shortening are vegan, not healthy, but vegan none the less. So when I was craving something like a Beef Wellington pastry I thought oooh I bet I could make those with fillo dough, pie dough, Pillsbury Croissant Dough, or even pizza dough! So for my first attempt I didn’t go straight to the Gardein Beef but instead to some veggies and Daiya cheese but please feel free to try these with any type of faux meat, vegetable, cheese, or even fruit! The Farmer’s Markets are brimming with good things lately so I encourage you to experiment with this. Make an eggplant parm fillo or even a butternut squash one with a pinch of cinnamon and brown sugar try a dessert fillo with peaches and earth balance , sugar, ginger, and cardamom. Whatever you can imagine will fit perfectly in this dough!

Fillo Primavera

____________________________________________________________________________________________________

Fillo Primavera

Vegan Fillo Dough

  • 1 box Organic Fillo Dough
  • 1 head broccoli
  • 2 tomatoes
  • 1 block Daiya Havarti Cheese
  • Kosher Salt
  • Pepper
  • Garlic
  • Dehydrated Onions
  • Olive Oil
  • Optional: 1 Container of Victoria Vegan Roasted Red Pepper Alfredo Sauce or Rao’s Marinara Sauce (Victoria Vegan Alfredo Sauces are available at www.veganessentials.com and Rao’s Sauces are available in most grocery stores including Whole Foods)

______________________________________

Prepare!

  1. Chop all veggies into tiny pieces to accommodate the fillo packages that will go in the muffin pan.
  2. Preheat the oven to 350 degrees.
  3. Spray muffin pans lightly with olive oil.
  4. Cut fillo dough into squares twice as large as the muffin tin holes.
  5. Place at least 3 sheets of the fillo dough square into each muffin tin hole.               Fillo Dough
  6. Spray dough with olive oil, sprinkle with Salt, Pepper, and Spices.
  7. Place chopped veggies and crumbled cheese into each fillo muffin.                                                                   Fillo Filling
  8. Add 1-2 tsp of optional sauces at this time like Victoria Vegan Roasted Red Pepper Alfredo or Rao’s Marinara.         Fillo Filling 2
  9. Sprinkle tops with more salt, pepper, and spices.
  10. Bring excess dough to a point and twist. Spray with olive oil and a sprinkle of finishing salt.

Cook!

fillo primavera baking

  1. Bake for at least 15minutes or until the dough on top starts to darken and the dough separates from the sides of the muffin tin. It may take longer depending on how dense your cups and what types of ingredients you filled it with.      Fillo Baking Done
  2. Note: Use more fill sheets for juicier fruits and veggies and less for more dense foods like chicken and broccoli.
  3. Serve immediately and enjoy!

____________________________________________________________________________________________

XOXOX,

The Hippie Gypsy

Veganized Savory Chicken Pot Pie

Lately, I have been addicted to Food Network Star. It ended the other night and the pie man lost but that didn’t make me lose the inspiration he created on screen. He could make anything into a pie. When I saw that grilled cheese pie with the short ribs I started to drool. I have actually been lucky enough to visit his restuarant in DC on my April road trip and was suprised to see they always feature multiple vegan pies there! However, I do not know how to make a vegan short rib equivalent so I started googling savory pies and looking at his pie shop menus. Chicken pot pie and chicken pie came up a lot in all these searches.

When I was a kid my mother would make Chicken Pot Pie a few times a month I swear. My father was always traveling and I can only imagine how stressed my mom was, so a one pot/pie meal was something she could throw together from all the leftovers during the week and we would have our bellies full. We either got it from scratch or in the box from Willow Farms that was fresh and local and a good alternative. My favorite however was just chicken and stuffing or potatoes. After watching Food Network and then googling for hours I decided I was going to make a chicken pie that was half chicken pie and a smidge chicken pot pie. I called my husband and told him to pick me up some pie crust on the way home. I was lucky because he got the refrigerated vegan pie crust from Whole Foods instead of the boxed kind and defrost was not needed.

NOTE: He is such a good sport about supporting my culinary undertakings without question.

I then embarked upon my first ever savory pie attempt and the stars must have aligned because it was the most delicious pie I had ever made. I don’t say this lightly because I make an amazing chocolate strawberry pie but this one was unbelievable. The crust was just a little sweet and perfectly flaky and the filling was hearty and subtle with an aroma of calming rosemary filling the house and the slight crunch of the diced broccoli stalks just finished it off. It will be ideal when Autumn hits. My husband, the resident omnivore, even had two slices before I was done with my first.

So let me tell you how I did it and you can make this for your Meatless Monday or meatless anyday or meatless everyday!

pie cut out

___________________________________________________________________________________

Savory Rosemary and Thyme Chicken Pie

INGREDIENTS:

Filling

  • 1 Container Beyond Meat Lightly Seasoned Chicken Strips (available at Whole Foods)
  • 1 head of broccoli
  • 1/4 of an onion ciabatta bread square (8×8) (or any bread you have leftover just add extra onions)
  • 1 carmalized onion diced into tiny pieces or 1/3 cup of dehydrated onions (which I prefer)
  • 2tbsp Rosemary
  • 2tsp Thyme
  • 2 tbsp kosher salt
  • 1tsp black freshly ground pepper
  • 1tsp granulated garlic

Sauce

  • 1cup Almond Milk
  • 1/3 cup Tofutti Sour Cream
  • 1/3 cup Daiya Mozzarella Cheese Shreds
  • 1/4 block of Daiya Havarti Cheese
  • 2tbsp Olive Oil
  • 2tbsp dehydrated onion
  • 1tsp salt

Pie Crust

  • 2 Vegan Refrigerated Pie Crusts from Whole Foods
  • Salt
  • Pepper
  • Thyme
  • Rosemary
  • Granulated Garlic
  • Dehydrated Onions

Finishing

  • Olive Oil for Misting the top only
  • Pinch of salt

pie slice

____________________________________________________________________________

COOKING:

Prepare Filling:

  1. Dice Beyond Meat Vegan Chicken.
  2. Dice into very small pieces broccoli.
  3. Dice cubed bread and soak in warm water for 3 minutes. Remove and add to mixture.
  4. Toss all ingredients of filling until well combined.

Prepare Sauce

  1. Place all sauce ingredients in sauce pan on Medium heat and stir until melted and well combined.
  2. Take off heat and add filling until all contents are covered in sauce.

Prepare Crust

  1. Preheat oven to 350degrees.
  2. Take both pie crusts and knead in spices and salt until well-distributed through dough.
  3. Press 1 crust dough back into pie pan and then place parchment paper and pie weights on top for precooking. If you do not have pie weights you can use canned veggies with the paper ripped off or dry beans you have on hand to weigh down the crust and keep it from bubbling up while you precook the dough. Do not forget to precook the dough or the filling will cause it to come out raw. Precook until lightly golden.
  4. Knead second dough with spices and salt. Roll out to twice the size of original dough as this will cover the heaping pie.
  5. Take pie crust out of oven and fill with filling/sauce mixture. It will be dome shaped on top. Press in and condense. The Beyond Meat chicken is already cooked so you do not have to worry about raw meat.
  6. Once all the filling is in the crust cover with the second seasoned dough. Tuck in the edges so that it forms and thick layer that has no holes at the seam of the pie pan.

pie oven 2

  1. Cut air holes on the top of the crust to allow for steam to escape. I say 4 1 inch slits always work out well.
  2. Mist lightly with olive oil and sprinkle a pinch of salt on top.
  3. Bake at 425degrees for approximately 30minutes or until crust is golden on top .

pie done oven

Eat. Serve. Enjoy.

Serves 8-10.

________________________________________________________________________________________________

XOXOX,

The Hippie Gypsy

Broiled or Grilled Peaches with Caramel Sauce

In the summer there are a few fruits that just beg me to eat them. Peaches are definitely one of them. The thing about peaches however is that other than eating them raw, putting them in iced tea, or making a galette I was always afraid to do much else with them. I mean they are soft and super juicy and I feared that any sort of cooking would reduce them to a sticky mess. Well the other night I proved my own fears wrong.

peaches

I invited a few of my guy friends over to have a cookout at my home with my husband and I. I made spiced vanilla cupcakes from the box (Organics brand using egg replacer and a dash of Penzey’s Cake spice then finished them off with a vanilla sugar). Then I took fresh peaches from my local Whole Foods in Swampscott and sliced them in half cut out the pit and put the oven on. The grill was off limits since my husband had been grilling steaks on there for the guys and I was not putting my peaches on that mess. Yuck.

The result was a softened warm juicy half peach enrobed in a quick stovetop caramel drizzle next to a slice of delicate vanilla spice cake. It was heaven and it was quick. Even the guys sighed when they ate them.

___________________________________________________________________________________________

Here is how I did it:

3 peaches
Coconut Spray Oil (like Pam but with Coconut Oil, I use Spectra brand)
1 Earth Balance Buttery Stick
1 cup brown sugar
1/3 cup Soy Creamer

  1. Preheat oven at 400degrees.
  2. Wash peaches to slightly de-fuzz them.
  3. Slice peaches in half and remove the pit.
  4. Spray a cookie sheet with Coconut Oil.
  5. Melt 2tbsp of earth balance in a teacup in the microwave and baste the inside and outside of the peaches until well covered.                                                                                                                          peach preperation
  6. Place peaches flesh side down on cookie sheet with fuzzy side up.                                        peaches baking
  7. Bake until they appear to be bubbling juices out about 15-20minutes.
  8. Then turn the broiler on to HI, move the peaches to the top rack, and broil until brown and black spots appear on the top of the peaches about 3minutes. This simulates the grill marks you would get if you grilled them instead. If you were to grill them you would do something similar with keeping them on the top shelf until then were cooked and soft and then bring them down to the lower grill grate to get the grill marks on them.                                          peaches broiled
  9. In a medium sauce pan mix brown sugar, remaining butter, and soy creamer over medium until melted and combined. Be careful it does not burn and stir often.
  10. Once caramel is reduced remove from heat.
  11. Drizzle peaches with caramel and serve with your favorite cakes or ice cream!

SERVES 6.

(WW Points for just Broiled Peach – 3pts for 2 halves)

_________________________________________________________________________________________

Enjoy!

XOXOX, The Hippie Gypsy